The Best Fudgy Brownies


These brownies are rich, fudgy perfection that are easy to make in one bowl – no mixer required! If you're gluten or dairy free, try my paleo double chocolate brownies or fudgy chocolate banana brownies.

Mira said: “After many failed attempts with other brownie recipes, I have finally found my holy grail and it is this recipe… I would fight people for these brownies. Incredible. ⭐⭐⭐⭐⭐“
I've been on a quest to make the perfect fudgy brownies for literally years. I don't even want to think about how many batches of brownies I've made, let alone eaten – that calorie count is not math I want to do.
My requirements were that they had to be:
- made in one bowl
- made without a hand or stand mixer
- fudgy, but not so gooey they're heavy and falling apart
- not cakey
- rich, but not overly sweet
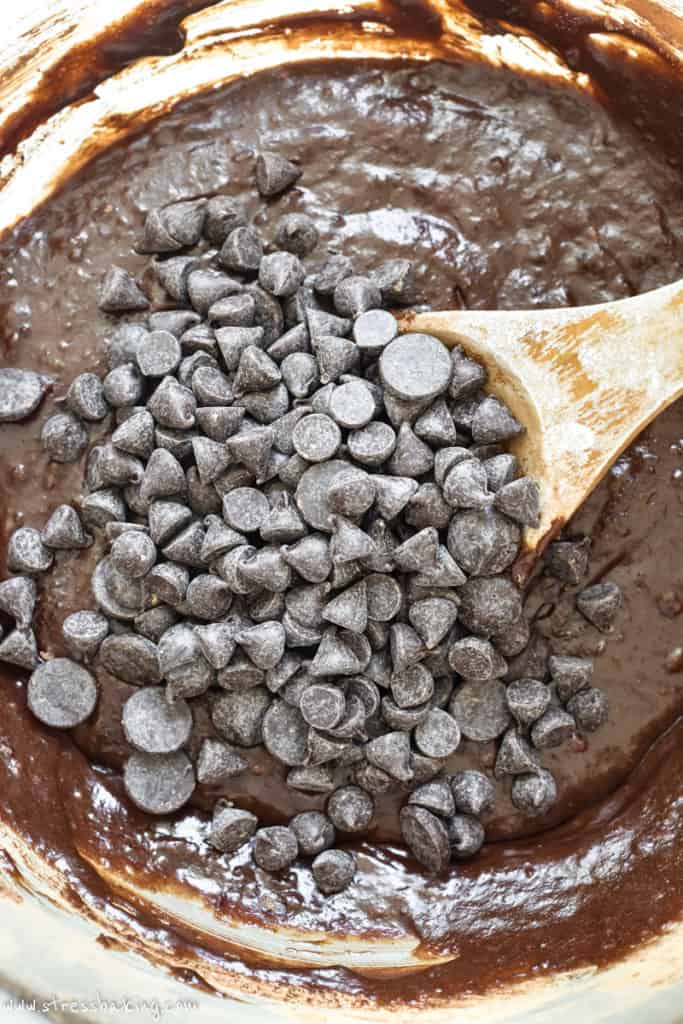
- packed with pockets of melty chocolate
- made in an 8×8″ pan and easily adapted for a 9×13″ pan

It was a lot of pressure to put on a batch of brownies, but it's totally paid off because I finally got them to be everything I wanted. Calling them “the perfect fudgy brownies” felt a little pompous, so I took it down a notch to call them “the best fudgy brownies” instead.
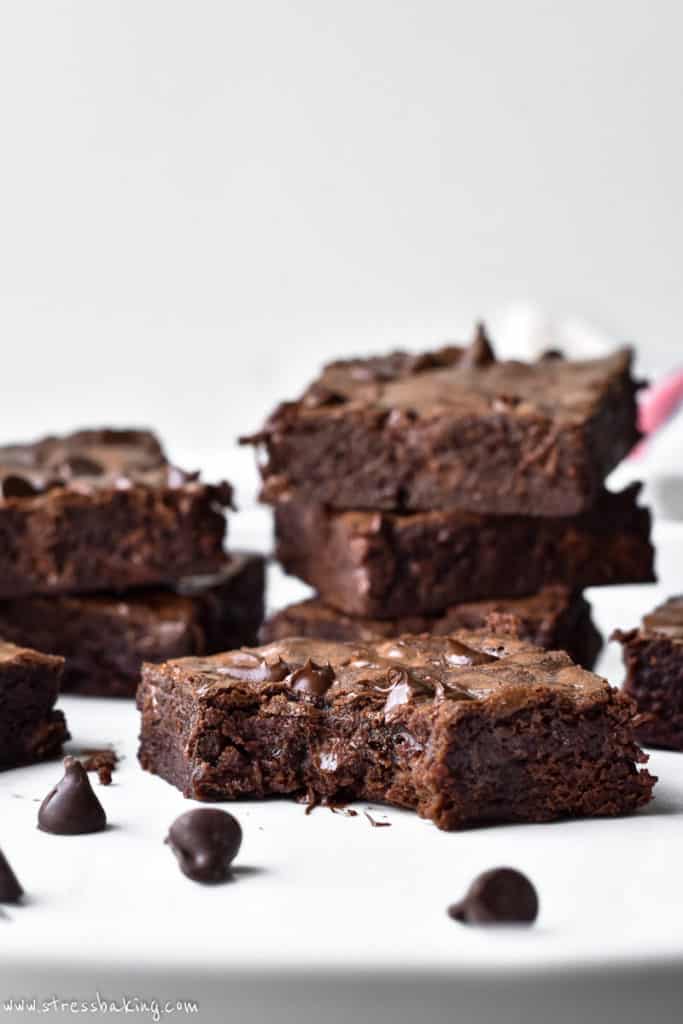
They're rich enough to warrant a partnership with a glass of cold milk, but not so rich that you turn into a motionless slug after finishing a piece.
The flavor is just just the right amount of sweetness to satisfy your sweet tooth.
They taste wonderful at room temperature, and even better warmed up so the pockets of chocolate get all melty and gooey.
What makes brownies fudgy?
Fudgy brownie recipes have less flour than cakey brownies, and higher amounts of fat – in the form of butter and chocolate. This combination gives them a rick, dense, moist texture.
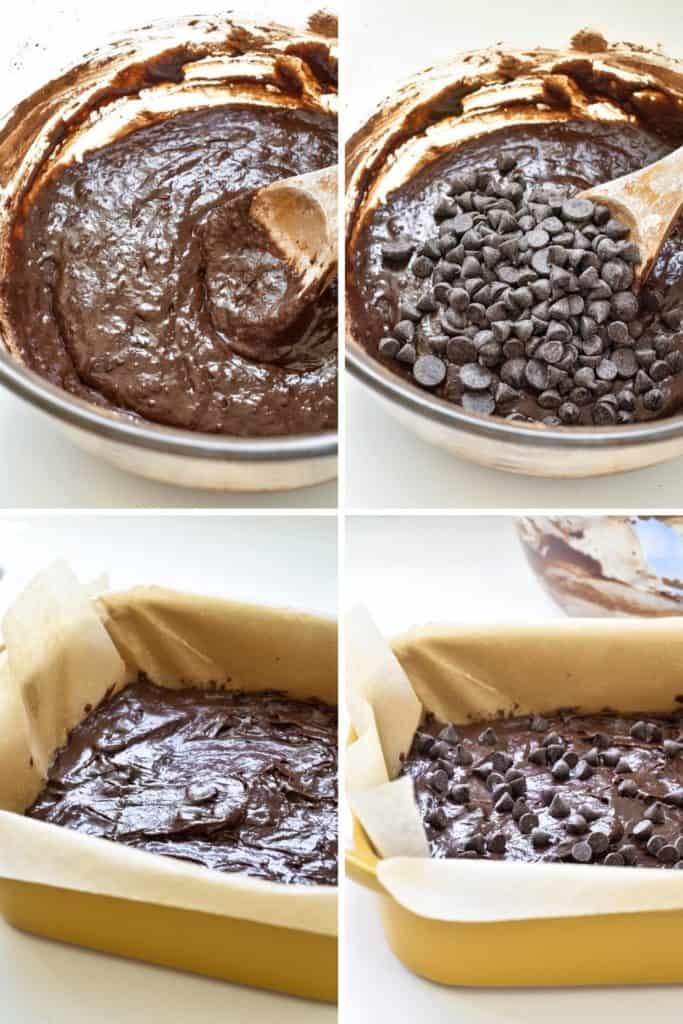
My coveted fudgy brownie recipe also starts with melted butter with eggs and sugars before adding the dry ingredients and folding in the chocolate chips. And even more, I call for 2 eggs instead of just one! Allllllll the moisture.
And to top it all off, we're making sure we don't overmix the batter, nor overbake the brownies. You almost want to err on the side of undermixing and underbaking. Not drastically so, just a little less time for both than your gut is probably telling you.
If you insert a toothpick into the center and get moist crumbs, it's done! But if you get a totally dry toothpick, that means they're overdone. Oops!

What kind of pan should I use for baking brownies?
Let me start by emphasizing that the type of baking pan matters. Truly. If you've ever made brownies from a boxed mix, you probably noticed that they call out different baking temperatures and times based on the type of pan that you're using (usually calling out 8×8″ metal pans vs. 8×8″ glass pans). There are reasons for that – so let's talk about that a little.
For the best results, bake brownies using a light colored metal baking pan or stoneware.
These types of pans allow for the most even cooking because they are efficient heat conductors. I personally prefer my stoneware, but many people report inconsistent results simply due to the differences in how the stoneware may have been made (hand thrown vs. poured in a mold). So to be on the safe side until you've learned how your pans perform, stick to light colored pans.
Why not a dark colored metal pan?
Well, dark metal pans distribute heat more quickly than light colored pans. You might be thinking, “I get to eat brownies faster then, what's the problem?” Valid point. Except that since they'll bake more quickly, there's a higher chance of them overbaking and the edges burning.
Fair enough. But what about glass pans?
Glass pans are insulators, which means the glass slows the flow of heat around your batter until the glass has heated up – and then it retains that heat a lot longer than metal or stoneware. Generally speaking, you want to turn the temperature down by 25° and bake longer (but how much longer can be tough to determine).
So that means that brownies baked in a glass pan take longer to bake, and it's unfortunately easy to overbake them because the center takes longer to bake than the edges. Which leads me to my next point…

Avoid the dreaded curled, tough brownie edges
This is another plug for using the a light colored baking pan or stoneware. With these types of baking dishes, you won't see that thing where the brownie edges climb up the sides of the pan and get tough and burnt.
As I mentioned above, brownies baked in a glass pan will cook the edges before the center is done, so you end up with tough, sometimes burned edges. Your brownies should be even from the middle all the way to the edges, and stoneware is my personal favorite for this recipe for even baking.
What kind of chocolate chips should I use?
I personally like dark chocolate, so my go-to is a chopped 60% bittersweet chocolate baking bar or dark chocolate chips – but you can use anything you like: semi-sweet chocolate chips, milk chocolate chips, or a combination of any of those.
I am personally drawn to a mixture of chopped chocolate bars chunks that get melty, and chocolate chips that retain a bit more of their shape.
Can I add nuts to this recipe?
Absolutely you can! I would recommend adding 1/2 cup of chopped walnuts of pecans at the same time you add your chocolate chips for a little added crunch.

6 tips for making the perfect fudgy brownies
- Make it a truly one bowl recipe by using a microwave safe bowl to melt your butter at 50% power as your first step. Then you can just add the rest of the ingredients and you don't need a second bowl or saucepan!
- Don't overmix. This is the worst thing you could do to your brownies! They'll be tough and you'll be sad. So when the recipe calls for stirring until just combined, I'm serious.
If you see a single streak of flour, stop stirring and just leave it! You're going to fuss with the batter again when you pour it into the baking pan, so it'll take care of itself. - Don't overbake, either. We're not going for cakey brownies, we're going for rich and fudgy brownie. But not fall apart, needs a spoon fudgy. There's a fine line between underdone and overdone, so you just want to watch them closely and have a good sense of how your oven is calibrated.

- Grease the pan, line it with parchment, and grease it again! Next to overmixing and overbaking, another terrible thing would be the brownies sticking to the pan. You want every last bit of that batter because it is so freaking good.
I use nonstick spray on the pan and on the parchment paper, but you can also use shortening or butter. Another method I've had success with is spraying the pan with nonstick spray, and coating it with cocoa powder before pouring in the batter. - Get clean slices with this handy trick. Wait for the brownies to cool completely. I know, I know. Now warm your knife under hot water, wipe dry with a cloth, use one fluid movement for each slice across the pan, and then wipe the knife clean between each cut.
Re-warm and dry between cuts as necessary as well. It's extra work, but worth it for nice presentation and even slices! - Even better, use a rocking pizza cutter! My favorite tactic is to lift the brownies out of the pan, place them on a cutting board, and use a rocking pizza cutter. It’s big enough to span the width and the length of the bars, so you get one long, even cut.
Want to make it in a 9×13″ pan?
Just double the recipe – easy peasy. The brownies will be ever so slightly less deep, but still delicious. Take a look at this post about converting recipes for different pan sizes to understand more about how the volume and surface area of each pan matters.
Can I freeze brownies?
Sure can! To freeze these brownies, bake them according to the instructions and let them cool completely. Don't slice them into bars, and wrap them tightly in a layer of plastic wrap, then a layer of foil, and place in a resealable plastic bag.
Store in the freezer for up to 3 months, then let come to room temperature before slicing into squares for serving.
Leaving a star rating is a great (and free) way to support Stress Baking! ❤️ After you've made this recipe, please consider clicking on the stars below to share your experience!
The Best Fudgy Brownies
Ingredients
- 2 large eggs, room temperature
- ½ cup unsalted butter, melted and cooled slightly
- ½ cup granulated sugar
- ½ cup brown sugar, packed
- 2 teaspoons pure vanilla extract
- ½ cup all-purpose flour
- ½ cup unsweetened cocoa powder
- ½ teaspoon espresso powder, optional, but encouraged
- Pinch of kosher salt
- 1 cup chocolate chips or chopped chocolate, divided (optional, but encouraged)
Instructions
- Preheat oven to 350°F. Spray an 8×8″ light colored or stoneware baking pan with nonstick cooking spray, then line with parchment paper so that there's an overhang on each side, and spray again with nonstick spray. Set aside.
- In a large bowl, combine eggs, butter, granulated sugar, brown sugar, and vanilla extract and stir until smooth and combined.2 large eggs1/2 cup (113 ½ g) unsalted butter1/2 cup (100 g) granulated sugar1/2 cup (110 g) brown sugar2 teaspoons pure vanilla extract
- Sift in flour, cocoa powder, espresso powder and salt and stir until just combined. Gently fold in 3/4 cup chocolate chips – no more than 2 or 3 turns to mix it in.1/2 cup (62 ½ g) all-purpose flour1/2 cup (43 g) unsweetened cocoa powder1/2 teaspoon (½ teaspoon) espresso powderPinch of kosher salt1 cup (180 g) chocolate chips or chopped chocolate
- Pour batter into prepared pan and use a spatula to spread it evenly. Top with remaining 1/4 cup chocolate chips.1 cup (180 g) chocolate chips or chopped chocolate
- Bake for 25-30 minutes on the middle rack or until the tops of the brownies are set to the touch – for my oven, 28 minutes is perfect. Carefully remove from oven and let cool completely in the pan. Remove from pan, slice, serve and enjoy!
Notes
Nutrition Facts
Nutrition Disclaimer
The provided nutrition information is generated by an automatic API and does not take variations across specific brands into account. This information is provided as a general guideline and should not be treated as official calculations. Learn more here.
This is my favorite brownie recipe ever! I recently found out I have a gluten intolerance and found this recipe still makes the best gluten free brownies! I use King Arthur measure for measure gluten free flour, add an additional 1/8 tsp of Xanthan Gum, and bake at 325 for 40 minutes (because of the different flour)! People can’t even tell they’re gluten free!!
thank you for sharing the recipe, I want to make it but it looks like I have to learn first
kampus sehat
this recipe its very useful, thanks ! please dont forget to visit our website too at http://news.unair.ac.id/2021/08/24/unair-atur-pemilihan-menu-makanan-pada-pasien-isolasi-mandiri/
I am thinking about doing this recipe and was wondering can I use a stand mixer to mix them
No, you want to freehand it with a whisk otherwise they’re going to be overmixed and tough.
I’m a brand new baker. This is my 3rd batch of brownies, ever, and I’m 30 years old.
I did not know that glass pans took longer to cook and cooked unevenly. In fact, I thought that glass pans were the superior in cookware.
I made the recipe and the batter tastes great.
I am so uncertain if my brownies are done though. They cooked for about 28 minutes.
I let them sit out fkr 30 minures but they’re still gooey. I’m reheating the oven and throwing them in for jla few more minutes.
I don’t have much time as it is wayyyyyy past my bedtime and well, work will be here sooner than I would like.
Any tips or suggestions for a beginner baker/cook?
Should I have let the brownies cool longer? Was my batter truly raw if still gooey after 30 min? The chocolate was still warm, which is why I cannot tell. If I had more time, I would have allowed them to cool longer.
I’m so confused!! I’m afraid of over baking them!!
Either way, wonderful recipe
Hi Marissa! As a new baker, I’d love to suggest you take a read through everything I have in my Baking Basics series: https://stressbaking.com/category/baking-basics/
Unfortunately since I’m not in the kitchen with you and can’t see what’s going on, it’s hard for me to troubleshoot your results. But here are my first thoughts:
1) Make sure your oven is properly calibrated, as it might run on the low side or have cool spots, which would mean it wasn’t truly baking at the proper temperature: https://stressbaking.com/how-to-measure-ingredients-for-baking/
2) Make sure you’re properly measuring out your ingredients – the most common error is over-measuring flour (but it doesn’t sound like it’s the case for your situation though): https://stressbaking.com/how-to-measure-ingredients-for-baking/
3) When you say they were still “gooey”, how do you mean? If they were still like raw batter, then it sounds like it’s definitely an oven issue. But if it was just that they weren’t totally “set” (meaning the tops were no longer wet, but if you lightly shook the pan side to side you could see some wiggle), then it could have used a few more minutes in the oven.
4) When you say the chocolate was still warm, are you talking about the batter, or the chocolate chips, or something else?
I hope this is of some help, and don’t hesitate to email me at leslie@stressbaking.com with any more questions – and feel free to include photos or video so I can try to be more helpful!
The brownies came out extremely bitter.
Oh no! That’s definitely not how they should have turned out.
Did you make any ingredient swaps, or reduce the amount of sugar? And what kind of cocoa powder did you use? I’ve found that if you use raw cacao powder or Hershey’s Special Dark, you could end up with a more bitter result than typical unsweetened cocoa powder.
Some people also don’t enjoy the flavor that espresso powder lends to recipes, so it could also be a matter of your personal preference as that flavor could be polarizing for some people who don’t enjoy it as much as I do.
Can we substitute kosher salt with normal cooking salt?
You can! Typically you’d want to use a smaller quantity since the crystals for table salt is so much smaller than kosher salt – but in this case, just can use a small pinch.
After many failed attempts with other brownie recipes, I have finally found my holy grail and it is this recipe. The only thing I changed was switching out 25% of the butter for coconut oil, and they’re so rich and fudgy. I would fight people for these brownies. Incredible.
This made my day – thank you so much for coming back to leave a comment and a rating!
Made these today and they were delish!! I only had a 9×9 stoneware pan so the batter was a bit thin on the edges but my husband loved the former texture of the end pieces :) I might try doubling and using the same pan for thicker brownies – would that work do you think? Thanks so much for posting this!
I’m so glad you liked them! To answer your question about doubling it in the same pan, I wouldn’t recommend it. A 9″x9″ pan typically holds between 8-10 cups of batter (depending on the depth of your pan), and doubling this recipe would give you roughly 13 cups of batter – and you don’t want to fill a pan more than 2/3 full. You’d be better off using a 9×13″ pan if you have one!
Take a look at this post for future reference – it’s really helpful for deciding what’s feasible for this sort of thing: https://stressbaking.com/baking-pan-conversions-made-easy/
So good!
I’m so glad you like them – thanks for leaving a comment and rating!
These brownies are super yummy my family really enjoyed…more than half the pan is already gone! They are delicious, easy to make with a quick clean up! What more could you ask for?! We will be for sure be making them again. Thank you for a keeper recipe!
Because seriously, who wants to spend all that time cleaning up when all you want to do is eat the brownies?! :) I’m so glad you liked them, thanks so much for the comment and rating.
Quick and very tasty! Definitely a repeat recipe!
I’m so glad you liked them! Thanks so much for coming back to leave a comment and a rating.